Showing posts with label Hybrid Projects. Show all posts

Jun 30, 2011

Timeless and Camping Adventures

My favorite designers each have new kits out this week. Danyale released "Timeless" on Thursday (which I guess I still technically today), and Isabel released "Camping Adventures" on Monday. I had a lot of fun playing with each, for completely different reasons!

First, with Isabel's fun camping kit:
Fam Camp and @ Night
created with Camping Adventures by Crisdam Designs

I had fun remembering this particular camping trip with our good friends.  We went a couple times together, once we even got to see the Thunderbirds practicing for graduation at the Academy!  On the trip these pictures were taken, we discovered that cheap Croc knock-offs were not good camping shoes.  While walking down to the stream near our campsite, Maggie managed to step on every cactus growing, and the spines went straight through the soles of those foam shoes.  :(

I also used one of Isabel's kits to make this page from our recent trip to Idaho.  We had so much fun visiting with old friends and spending time with family.  I actually rode a mountain bike. On a mountain. I may have to scrap that one in the future, because there is photographic evidence!  But in the meantime, I made this sweet page of my son and sister-in-law.

Bubbles
created with Project April by Crisdam Designs
Kit, Alphas, and Bits & Pieces
Template by Mye de Leon
I'm pretty sure I could find a similar pic of my daughter and SIL if I looked through my collection.  She's such a great aunt.  The kids love to play with her.

I have been drooling over Danyale's new release from the moment she started posting previews in the team forum.  I couldn't wait to get my hands on this one!  The colors are absolutely gorgeous, and I love the large scale paisley patterns.
All Dolled Up
created with Timeless by Etc by Danyale
Kit, Frame Walls, Wedding Add-on
I love the candid photos I've seen online of weddings and events that include these frame walls that I had to mimic the looks with my page. Mmmm....and that chandelier, LOVE it!!

I also took some time to be hybrid with this kit.  Well, I guess I really didn't go fully hybrid (on this project anyway), but I printed out a card with some of the other pieces of the kit and add-on. I have a wedding coming up that I might just use this card for -- unless I hit another creative streak!
Congratulations Card
created with Timeless by Etc by Danyale
Kit, Wedding Add-on (see photo above for links)
In the next couple days I'll be back to show off the other hybrid creation I made. This one was as a gift for a friend who is moving away. It makes me sad that she is moving, but I'm excited she is able to move closer to family.

Until then, Happy Scrapping!

Oct 17, 2010

Gearing up for Halloween

The kids are getting excited for Halloween around here.  Maggie and her friend have been discussing decorations at length. They decorate the neighbor's front lawn over the course of last weekend. Now Maggie is nagging me about decorating our own front lawn (and ignoring the fact that movers will be here this week to pack up everything we own). But one thing I will indulge her with, is a new Halloween candy bucket. I let her pick out the papers and embellishments that went into the design and then whipped up this little prop for her. I did have to weed out some extra embellishments she wanted (it would have looked like a product preview if I had let her have her way).


After printing (2 pages, as the bucket's circumference was larger than one page), I just trimmed the two pages up, glued them together, and popped them inside the bucket. I happened to have found a clear bucket at my local craft store, which means I can easily redesign this to house a Christmas gift in a few months, or to match Maggie's room and use for storage.
Kit: Spooktacular by Sweet Digi Scraps
Word Art: Spooky Word Art by Sweet Digi Scraps/Designs by Danyale
Journaling reads: Captain Maggie Sparrow plundered the neighborhood for candy on All Hallow's Eve 2006. Her legend will forever haunt the block. But don't worry about that hook she's brandishing here. It's the peg let you have to look out for.

While I was in a Halloween mood, I also put together this page, with a picture that was a few years old. I loved the word art, and thought I'd bring this memory out of hiding.  I do still need to remember who put the whiskers on her face though...she was not wearing those when we left our house headed for the neighbor's house that served as a base for trick-or-treating.

On the moving front, we just received word that we can schedule our move in (back to a house we own, but were renting out) anytime after the 26th! So things are moving faster than we anticipated...but we are so looking forward to getting settled in. I may not be around much this week, between supervising the packing and chasing after the baby, it's going to be a full week! Thanks for stopping by!

Oct 15, 2010

I'm On a Hybrid Roll

No, I did not get a new car. But I have been working with my digital supplies and my printer more in the last couple weeks than I have ever had the guts to do.  I've made the couple of cards I've posted here, and in the last week I've finished two hybrid projects that involved more than just printing out a digital design.  The first was made as a gift.

I saw Laurie at Jessica Sprague create these organizers for her son, and I had grand plans to make a set of my own for my son as well.  Now that he is 9 months old, and most of the clothes we were gifted are outgrown, I have little need for a set of my own. Since I had the chipboard pieces, and some good friends with a new baby girl, I decided to rethink my "boy" theme and create some for a girl.

They were very simple to make, once I got the chipboard scanned and turned into a template.  Laurie goes in to detail about how she did this, so I won't repeat, but it really was simple.  Once the template was made, it was just a matter of popping papers and elements into the designs, printing, and cutting.

The hard part for me was finding a brown paint to go over the edges, since I didn't want the chipboard showing through (and since I can't cut a round line to save my life...I needed to hide some less than perfect paper edges).

Once they were finished, I had to make a cute bag to match...and pulled out my neglected stamps for the bag.  Welcome to the world, Gracie! We can't wait to meet you.  (Oh, and Gracie should have already received these, so it's safe to post about them.)
The kit for the closet organizer is "Spoonful" by Litabells Designs. Stamps on gift bag are from Stampin' Up.

My second project is ALMOST finished, but not quite.  Check back later this weekend for a cute Halloween treat bucket!

Oct 11, 2010

In the Hood!!!

The minute I saw this kit, I knew I wanted to work with it. :)  I think I may have moving on the brain!  I've redone my blog header and background (though there is still some tweaking to do there), made a layout, and a postcard.  I really am going to send the postcard to family, since some of them didn't find out we moved LAST October until our baby was born in January.  Ooops!  (I reworked it after I printed this version to include our actual address, but didn't feel I needed to publish that on four different Internet galleries and here on my blog. Call me crazy. Or paranoid. Whatever. Anyway, without further ado, here's what I did with Crisdam Designs' "In the Hood":


I can't wait to send these cards out! The best part is, I only have to cut cardstock for the back (each 8.5x11 piece will make 4 cards), pop the printed card onto the stock, and put them in an envelope!  If I wanted I could even probably turn them into a real card, using the printed portion as the inside, tape them closed and address the outside of the card.  Come to think of it, that might even be easier than using an envelope!!  Thanks for letting me brainstorm with you!

I'll be back later this week with more layouts, and I have another hybrid project I've been working on (and finally finished) and an announcement.  The two are *kind of* related, but I didn't know it before I started the project. :)  Hmmm...wonder what they are???

Oct 3, 2010

A Post to Catch-Up...

It's been over a week since I last posted and in that time I've played catch-up with my CT responsibilities and my creativity.  Both seem to be well in working order now.  As this will be an image heavy post, I'll pretty much let the layouts speak for themselves.

From MLAS:
I Love You
Kit: Wishful Happiness by jusme digital
Fonts: karabinE. and Georgia
Journaling is about how quickly he has grown.

Fall Approaches
Papers, elements, and alpha: Indian Summer by Tempus Fugit
Torn Paper Pieces (masks) by Tempus Fugit

Believe in Yourself
Kit: Hope for Tomorrow by Jen C Designs (new at MLAS in October)


And my newest CT addition is Crisdam Designs (Isabel Mendez).  I am very excited to start working with her designs,  and this kit is no exception.  I was so excited, in fact, that I threw a card together after I finished making this page (that word art was just BEGGING to be put on a card front:
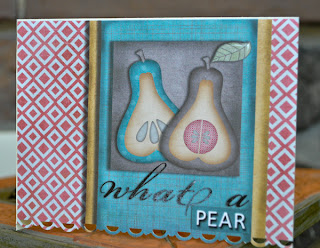
What A Pear
Kit: What a Pear by Crisdam Designs
Template: Scraplift with a Twist September 2010 by Isabel Mendez (Crisdam Designs)

Card made with What a Pear by Crisdam Designs
Punch: Stampin' Up

One note on the subject of hybrid -- I am on a bit of a hybrid kick.  Maybe it's because I put the printed nearby where I sit with the computer, or I'm just hitting some great hybrid inspiration (and happen to have the right supplies on hand, a HUGE key), but I have another project I've been working on just for fun.  It should be finished up in a day or so, and I'll post up some pics (after I send it to the person it's intended for...wouldn't want them to see it here first!!)

And here's one last layout just for fun, that I put together a couple weeks ago and never posted.  Here's a blast from the past picture of my siblings and I in our grandparent's backyard:
Halloween Memories
Layout inspired by 9/13 Speed Scrap at Gotta Pixel
Papers and Elements: Spooky Halloween by Lindsey Jane
Fonts: Downcome and VT Portable Remington

There will be lots of new stuff this month from Sweet Digi Scraps, as Liz is in the spotlight at GottaPixel for the month of October, AND I'm on her "Battle of the CT's" team, so will be participating in the challenges at digiscrapaddicts.com for that.  A lot coming up in October, both in the scrapbooking world and at home, with our impending move...  Looking forward to a busy, busy month!

Sep 18, 2010

SDS Blog Train!!!

There are all kinds of fantastic goodies today from the Sweet Digi Scraps CT.  We've put together a blog train of quickpages and printable treats from our favorite SDS kits.  Here's the list of blogs to visit today:


Liz: www.sweetdigiscraps.blogspot.com
Team Blog: http://creativesweeties.blogspot.com
Danyale: http://bygonesscrapbooks.blogspot.com
Lei: http://leidee-q.blogspot.com
Kerry: www.kayjaysdays.blogspot.com
Jan: http://intensemagicscraps.blogspot.com
Sheila: www.scrappingmyjourney.blogspot.com
Colie: www.coliescorner.blogspot.com
Cynthia: http://thelatinmrspeel.blogspot.com
Mary: http://texaschicstyle.blogspot.com
Dana: http://www.scrappydoosordonts.blogspot.com
Trista: http://www.busybee-hive.blogspot.com
Simona: http://lightmistress.blogspot.com
LaShawn: http://the3cbears.blogspot.com
Carolyn: http://carolynscommotions.blogspot.com
Barb: http://digi-dallies.blogspot.com
Rachel: http://www.iwishiwasthatcreative.blogspot.com***You are here***


For my stop on this train full of goodies, I've created some corner bookmarks with two of my favorite kits. The first two were made with "As We Know It."

The colors were the first things that drew me to this kit.  Then I saw the stitched frame, the arrows, and that cute little pearl bead.  I think this is the first of Liz's kits that I ever bought.  I made this layout of my daughter with it -- one of my favorite recent layouts with her as subject.

The second two are made with "Secret Crush." One of the newer kits by Liz.  Again, I love the teal, this time combined with the pink and black to make a super sweet kit.

My favorite pieces of this one are the butterflies, the lace ribbon, and the leafy doodle.  Cupid is pretty darn cute too.  I made this layout of hubby and I with this kit. It was perfect for the Then and Now effect I was going for with the photos.

Without further ado, here are a couple pictures of the bookmarks all put together.
The bookmarks fold flat, and "hug" the corner of your pages.

Secret Crush Bookmarks (there is a blank on the one on the left for you to add your name, or the name of someone special)
As We Know It Bookmarks


DOWNLOAD HERE

Instructions are included in the download.  Each set of bookmarks is provided in jpeg format for easy printing at home on a standard 8.5x11 printer.  Hope you enjoy them, leave a comment if you download, I'd love to hear feedback!

Thanks for stopping by, and please continue on the SDS Team Favorites Blog Train! There are lots of goodies out there.

Jun 3, 2010

Teacher Gifts


I found a link to a bookmark template and had to give it a try.  I like these because they cover the corner of the page and seem like they would be harder to lose one's spot with (I am always pulling my bookmarks out accidentally).

The template was only an outline with fold guides, meant to be used on traditional paper.  Because it was a bookmark, and the creator of the template warned about using too many embellishments on them (they do have to go INSIDE a book!), I turned it into a Photoshop template and have been cranking out the bookmarks since then.  The blue and brown one is for me, and the peach one is for my daughter's teacher.  I have made a third with more masculine elements for the teacher's husband who also helps out in the classroom.  Between the bookmarks, the hybrid can from my last post, and the Barnes & Noble gift card, we are set for teacher gifts!  (And I've had fun in the process!) 

May 30, 2010

Hybrid Challenge - Tag!

This week's challenge at jessicasprague.com is a hybrid challenge.  I don't usually work in hybrid -- I'm either traditional or digi on any given project, so these really are a challenge for me.  (Part of my challenge is the tendency to stop midway through a project...I have several hybrid projects that are ready to be printed, but never get further.)  The challenge was to create a digi tag, print it, and use it.  Not wanting to pull out my traditional supplies to create a layout, and not having any pictures to put on said layout, I started thinking about other ways I could use a tag.

I realized we are getting ready to start the last week of school and I didn't have anything for my daughter's teachers.  Enter the challenge!  I created a digital canvas on which I put together the label and lid for this can.  I printed the label without the Thanks tag, then printed the tag and the lid, cut each piece out, used my handy Xyron sticker-maker (plus a few pop-dots) and put the whole thing together.  I wanted to do a summer reading theme, but didn't have time to make my own word art, and couldn't find any that had reading as the subject, so switched to a generic thank you. 

Now all I have to do is pick up a Barnes & Noble gift card tomorrow while I am doing the grocery shopping and we are all set! 

Credits:
Papers by HRoselli (stripe), SClingerman (text), MCato (dots) from Take Flight collab at Sweet Shoppe Designs
Journaling Tag by MBennet from Take Flight collab at Sweet Shoppe Designs
Word Art by House of 3
Circle Journaler by Crystal Wilkerson from Room Collection Elements
Flowers from my stash -- bought at JoAnne's, but I don't know the manufacturer.

Apr 28, 2010

More iron-on transfers...

I'm on a hybrid kick this week. More accurately, I'm on an iron-on transfer kick this week.  After royally messing up my daughter's tote bag, I decided to take a step back and work on t-shirt material. 
The t-shirt was much easier to work with. This one was printed with a transfer designed for dark colored shirts.  The design did not need to be reversed for printing, and the transfer itself is white instead of transparent.  And the boy even cooperated this morning by falling asleep right before I started taking photos.  So appropriate for the shirt's slogan!

Credits: Metal plate, screws, and rocket from Sci-Fi kit by Sugar Moon. Part of designsindigital.com's Next Design Star 2010 competition. Font: Back to the Future from dafont.com.

Apr 26, 2010

Jessicasprague.com Weekly Challenge - Hybrid!

This week at jessicasprague.com the weekly challenge is their first ever hybrid challenge. The challenge was to create something using iron-on transfers. All the examples shown were t-shirts and onsies, which I am definitely going to jump into. But I figured if I was going to try something new, I may as well go all the way. My daughter has been asking for a new backpack, as apparently there is a hole in her old one (though I have yet to SEE the hole). So we decided to make her a personalized tote bag instead. Here's what we came up with:

We were both super excited about the results, until I tried to "fix" the spot around the owl's right eye. Can you see it? The transfer didn't quite transfer all the way. Note to self: do not try to re-iron a transfer...it just won't work. So even though I took the photos early enough, Mr. Owl did not survive the day, and the tote now needs to be redone. I think I may make a grungy name plate to completely cover the old owl, and reprint him for the other side of the bag.

Regardless of the outcome of the owl and tote bag, I can't wait to get going on the onsie I have planned for my son. I'll post pics when I have it all done up. And next time, I think I'll START a new project with the simpler of two options rather than starting with the one that will cause the most challenge. But that's why they call it a challenge right? :)

Tote bag credits: Owl: Crystal Wilkerson's Happy Little Owls (jessicasprague.com). Word art: from Carnival kit from Sweet Shoppe Designs.